Laravel Database Connection and tables
Today I brought you another tutorial on Laravel. We have to connect to a database when we do a project with the manipulation with data. So, this is the way how to connect to the database and make tables using migrations available in Laravel. Previously created project will be used here also, for my ease. If you didn't start a project, visit here to start a new project in Laravel.
Create an application key for your project. It will be used to configure sessions later. See the below image to get the idea about this key published in Laravel official site.

Step 1
Create a new database called laravel_test in your http://localhost/phpmyadmin.
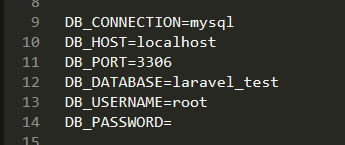
Open your project folder and find a file called .env(not .env.example). You can see a lot of configurations. Among them, find the term DB_CONNECTION. Then make changes like this. I changed only DB_HOST, DB_DATABASE, DB_USERNAME and DB_PASSWORD. My database is laravel test. I have not set a password and the default user; root is given. If you have changed these when configure PHP, provide them accordingly.
Open your project folder and find a file called .env(not .env.example). You can see a lot of configurations. Among them, find the term DB_CONNECTION. Then make changes like this. I changed only DB_HOST, DB_DATABASE, DB_USERNAME and DB_PASSWORD. My database is laravel test. I have not set a password and the default user; root is given. If you have changed these when configure PHP, provide them accordingly.

Step 2
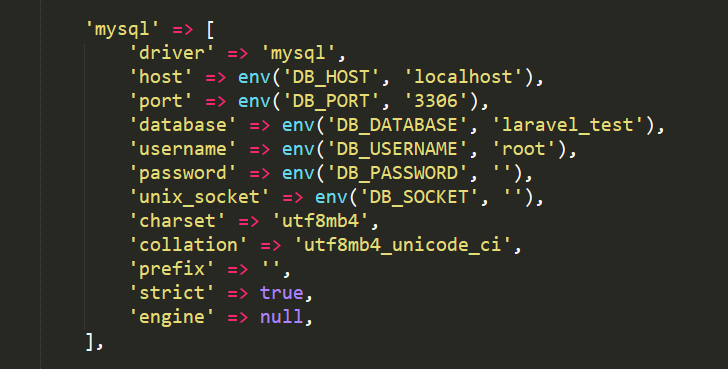
Open the file called database.php included in config folder. You will see several configurations should be used according to the SQL version used in a project. Since I use MYSQL, I only configure the part reserved for MYSQL. Use the same credentials used in the previous step.

Step 3
Go into the folder called migrations included in database folder. It has a migration file made by default. Delete that file. We are going to make new changes to the database. So don't worry about it.
Step 4
Now we have to make a model for database functionalities. I think you will know how MVC architecture works. Model is responsible to handle database as you know. To make a model, we use cmd. Open cmd and go into the project folder. Then type the below command to make a model. My model name is User_model.
php artisan make:model User_model -m

In Providers folder now you have the model names as User_model.

Step 5
This is the most important step. Unlike Codeigniter, this Laravel framework can change the database using migrations. Open the migration file in database/migrations folder. This is made by default when the model is created.

Now I'm going to change this migration file to create a database table according to the way I needed. In the migration file, up function creates database table and down function removes the table. I will change up function. My database table name is users.
$table->increments('id') - This will add a column called id with auto increment.$table->timestamps - Adds two columns called created_at and modified_at.Now I need another two columns for first name and last name of users. How to do it?

Step 6
Now we are ready to migrate. But there's an additional step to be followed. If you migrtae now, there will be an error. To avoid it you have to do something. In your project folder, open the file called AppServiceProvider. File path: Http/Providers/AppServiceProvider.php
Now edit the file and update it with this code!
<?php

namespace App\Providers;

use Illuminate\Support\ServiceProvider;
use Illuminate\Support\Facades\Schema;

class AppServiceProvider extends ServiceProvider
{
    /**
     * Bootstrap any application services.
     *
     * @return void
     */
    public function boot()
    {
        Schema::defaultStringLength(191);
    }

    /**
     * Register any application services.
     *
     * @return void
     */
    public function register()
    {
        //
    }
}
Step 7
All changes have been saved I made. Now I need to create this users table in localhost/phpmyadmin. So, Laravel gives us a migrate command to do this easily! Type this command in cmd. Then new migrations will be created and updated.
php artisan migrate

Now you have come to the last part of this article. The database table has been created. Go to localhost/phpmyadmin and select the database laravel_test. You willl see two tables called users and migrations.

I think now you can understand the way to create a database connection and manage tables in it. These migrations are just one amazing feature in Laravel. So, try to get used to this framework. Still, I'm also learning this...
Good Luck!


22 Comments
Laravel Database Connection and tables
ReplyDeleteThanx
DeleteIt is nice blog Thank you provide important information and I am searching for the same information to save my time
ReplyDeleteAngularJS 5 Online Training Hyderabad
Thank you for the feedback Teju! You are a regular visitor as I think :D Keep reading my blogs..
DeleteThanks for sharing the useful blog about Laravel Database Connection and Tables. Nicely explained.
ReplyDeleteWeb Application Development Company in Coimbatore
Web Design company in Coimbatore
Thank you Gayathri! It's a pleasure to hear..
DeleteLaravel Development Company, Laravel is among the best PHP-based web app framework that is free and open-source. We offers a robust team of Laravel developers and programmers offering high-end and reliable solutions at highly-competitive rates. Contact us : +91-9806724185 or Contact@expresstechsoftwares.com
ReplyDeleteThanx Mark! Ya you are correct...
ReplyDeleteBeen looking for this, Thumbs up man
ReplyDeleteGlad to hear! thank you :D
Deletecloudi5 is theWeb Design Company in Coimbatore. Clouid5 builds many responsive and professional websites according to the business needs. Cloudi5 offering many services like digital marketing, SEO, PPC, social media marketing, web design, landing page design, redesign website, web development company in coimbatoreetc,
ReplyDeleteThank you very much for your feedback
ReplyDeleteGlad to hear!
ReplyDeleteThanks for your feedback
ReplyDeleteGlad to hear!
ReplyDeleteclass 9 tution classes in gurgaon
ReplyDeleteThe connection to the server localhost:8080 was refused – did you specify the right host or port?
az 104 exam questions
ReplyDeletescrum certification exam questions
dp 900 exam questions
SMM PANEL
ReplyDeleteSmm panel
İS İLANLARİ BLOG
İNSTAGRAM TAKİPÇİ SATIN AL
hirdavatciburada.com
https://www.beyazesyateknikservisi.com.tr/
servis
tiktok jeton hilesi
Now Infycle Technologies has launched the most amazing Dot Net Training in Chennai for college freshers. And also we include extra technical courses, 50+ online courses, and a fabulous pay scale for MNCs organisations. For more questions, 7504633633 or 7502633633.
ReplyDeleteGood content. You write beautiful things.
ReplyDeletevbet
sportsbet
vbet
hacklink
hacklink
taksi
sportsbet
mrbahis
mrbahis
başakşehir
ReplyDeletebayrampaşa
beşiktaş
beykoz
beylikdüzü
85CM8
https://saglamproxy.com
ReplyDeletemetin2 proxy
proxy satın al
knight online proxy
mobil proxy satın al
OLTVD