Create and Host a web application with React, SpringBoot, MongoDB and Heroku - Part 1

Hi guys! I came to meet you after a long time due to my busy schedule..I hope to discuss a very interesting topic with this article, today..What's it? Let me explain simply. You guys should already heard about REST APIs if you are interested in web development. So, here I'm going to create a REST API using SpringBoot Java framework and MongoDB. I use an online MongoDB platform called mLab. Then I host this API in Heroku cloud application platform. I need to create a front end also to deal with the API. I will create my UI with React and host it in Heroku. Finally this whole application will be publicly available on the web guys! This is a real practical guide to create a functioning web application on web.
NOTE: This is only the part ONE! Here I will tell you the way to deploy a Java REST API on Heroku.
Let's start!
I will use an API which I have already developed with slight changes. You can clone it from my GitHub link shown below.
If you want to get the knowledge on creating a REST API with SpringBoot, follow this article I published on my blog.
1. Connect the downloaded REST API with mLab
This application I developed was running locally on my laptop and connected with local MongoDB installed in my Laptop. So we have to change it and connect to a live MongoDB server. That's why I use mLab in this tutorial. If you don't have a mLab account, please go and register yourself.
Then:
- Click on create new to create an environment.
- Click on AWS and then select free version - SandBox. Then click on continue.
- Select any region. I selected US East. Then click on continue.
- Then give a DB name you like and click on continue.
- Submit the Order. Don't worry it's totally free!!! Now you have a DB on mLab!
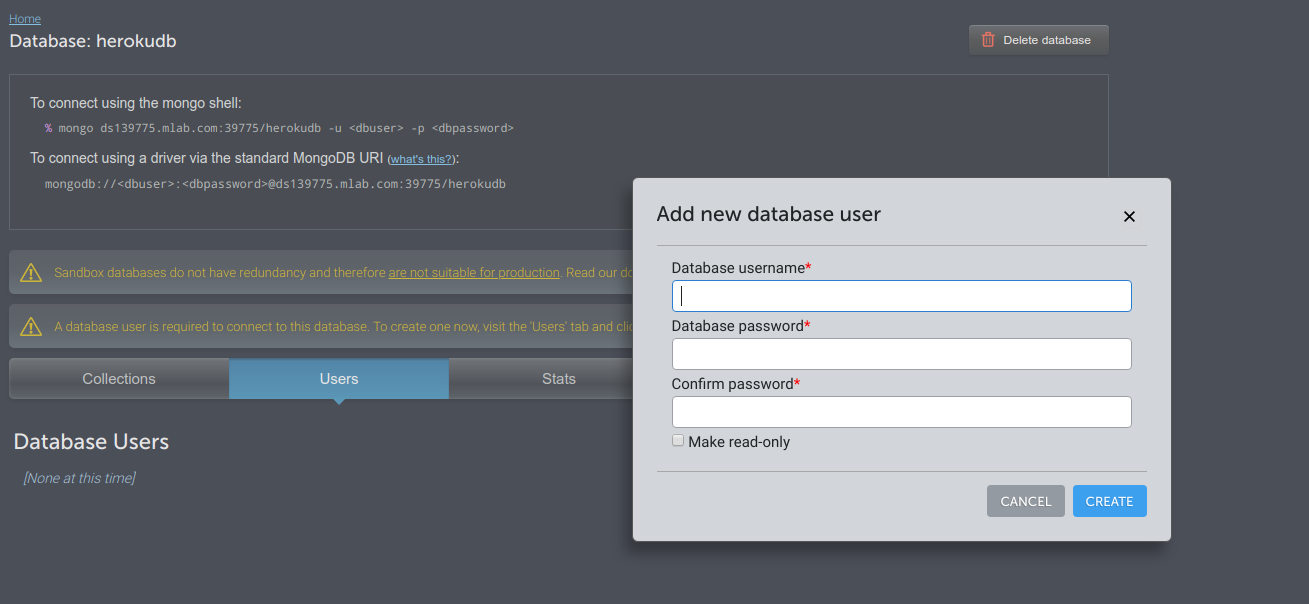
You can see your DB on your dashboard now! Select the DB by clicking on it. Look at the line like this..In my case the DB is herokudb. You need to create a DB user!
Move to the users tab and click on add database user. Don't use special characters when you create a password for the user. Special characters make errors sometimes when we try to connect mLab via an application.
2. Modify Java REST API properties
Now we are going to modify our API. Open the java properties file located in /main/resources folder. We have to connect mLab DB to this application, which we have created before. But how to connect? You will have the below code on properties file now.
spring.data.mongodb.host=localhost
spring.data.mongodb.database=api
spring.data.mongodb.port=27017
We don't need a PORT since it will be configured by Heroku later when we push this API to Heroku. Comment or remove first line. Go to the mLab account again!
You can see this kind of line on your selected DB UI in mLab account dashboard. The word phrase comes after the @ sign will be different..It's assigned randomly.
mongodb://<dbuser>:<dbpassword>@ds139775.mlab.com:39775/herokudb
Here you have to put your DB user and password you created. Like this...
mongodb://salitha:ald1234@ds139775.mlab.com:39775/herokudb
Copy this code and paste in the properties file.
spring.data.mongodb.uri=mongodb://salitha:ald1234@ds139775.mlab.com:39775/herokudb
Remove all other lines! This will be the only code in the properties file which is needed for our deployment.
Create a collection called users in your database. Then it will be used throughout the application.

Insert a document into the collection. It should be in this format.

3. Connect to Heroku
Sign up in Heroku and install Heroku CLI to your machine. Then we can push the codes via terminal/cmd, like we do in GitHub.
Login to it using your terminal. Command => heroku loginMore details: https://devcenter.heroku.com/articles/heroku-cli
If you have not done anything with Heroku and if you want to grab more knowledge on hosting SpringBoot apps in Heroku, visit the below link. It's a guide provided by Heroku itself.
4. Push the code to Heroku via Git
Now we are ready to start deployment! Go into your project.
Open your terminal/cmd and go into project folder. Then follow the below commands.
git init
git add .
git commit -m "Add app to Heroku"
Now it's time to create an application on Heroku with a preferred name. It will create an application with a URL like https://app_name.herokuapp.com... If it says that this name is already taken, give another!
heroku create javaspring-api
Now all are set to push the application to Heroku. Perform this command!
git push heroku master
It will take some time.. Heroku will check on... If all the steps have been completed successfully, now your app is ready to be used in public.
In my case, I have set app name as javaspring-api. So my APP URL will be https://javaspring-api.herokuapp.com. Now I'm ready to check this on web guys!!!
Before this, let me to tell you about the API end points of the deployed API. Otherwise we can not check the API correctly. Only the app name will be different when we compare these ones with your ones.
https://javaspring-api.herokuapp.com/api/users
https://javaspring-api.herokuapp.com/api/users/id
https://javaspring-api.herokuapp.com/api/users/add
https://javaspring-api.herokuapp.com/api/users/update
https://javaspring-api.herokuapp.com/api/delete
We can check API with the first end point since it is for retrieving data from database via a GET request. So in my web browser, I will type this.
https://javaspring-api.herokuapp.com/api/users
It should return a JSON with user objects. Let me check..Try with your one guys!!!
Got results? I think you should get the output if you have followed me. Isn't it nice? Now you have a public java API that can be used to test any UI application!
The SECOND part of this guide will be based on creating UI with React JS and connecting this API with it. It will be interesting since I'm planning to deploy it also on Heroku!
Till then, Good Bye guys!


14 Comments
Aplikasi OVO tentu sudah tidak asing lagi terdengar di telinga kita. Umumnya aplikasi ini paling sering kita jumpai di mall mall, dimana bila kamu menggunakan OVO
ReplyDeleteasikqq
dewaqq
sumoqq
interqq
pionpoker
bandar ceme terbaik
hobiqq
paito warna
bocoran sgp
data hk
This post is wonderful and thanks for sharing.check it once through
ReplyDeleteFull Stack online Training
Full Stack Training
Full Stack Developer Online Training
Full Stack Training in Hyderabad
Full Stack Training in Ameerpet
Full Stack Training Institute
Great Article. This info is very useful.
ReplyDeleteMern stack training in hyderabad
Thanks a lot
DeleteThanks For Sharin With Us.It gave me a lot of Helpful
ReplyDeleteinformation.
Angular JS Online training
Angular JS training in hyderabad
Thank you! Stay with my blog :D
DeleteThanks Sneha :D
ReplyDeleteVery interesting to read this article. spring boot online training!
ReplyDeleteThank you!
DeleteSay, you got a nice article post.Really thank you! Really Great.
ReplyDeleteoracle bpmonline course
angular jsonline course
sql server dbaonline course
oracle golden gateonline course
nice thanks .........................!
ReplyDeletespring boot certification course training
Hi ,Thanks for the Tutorial, very useful , We are a Software development Company , Do check our website .
ReplyDelete11Xplay is your go-to platform for an unparalleled online gaming experience, offering sports betting and casino games designed specifically for Indian players. Enjoy live sports betting, favorite games such as Teen Patti and Rummy, along with fast, secure payments and instant withdrawals. The platform boasts a user-friendly interface and 24/7 customer support to ensure a hassle-free experience. Explore other top-notch platforms like Lotusbhai and Betbook250 to elevate your gaming journey to the next level!
ReplyDeleteSatsport is your ultimate destination for cutting-edge sports insights and services in India. Offering a seamless platform for sports enthusiasts, we specialize in delivering real-time updates, secure transactions, and an unmatched user experience. Discover the best of sports engagement with Satsports today!"
ReplyDelete