Deploy a Laravel application on Heroku with MySQL database
Hello guys! What's going on? I hope you are doing well. I'm going to guide you for an interesting tutorial today. Have you ever deployed a Laravel application which makes anyone to access on web? If you haven't, this is the article for you! You have only simple things to do! Just Follow me...
Step 1 - Create a Heroku Account and Install Heroku CLI
Go to https://heroku.com and create an account for you. Then you have to install Heroku CLI to your machine. It helps to connect with Heroku cloud platform using commands on CLI.
Follow this link:
Step 2 - Create a new Laravel Project
Open terminal and create a project like this..
composer create-project laravel/laravel herokudep99
Step 3 - Heroku Login
Open your terminal and Login to Heroku platform. Provide your username and password.
heroku login
Then you will be navigated into a browser window to login.
Now you will be able to communicate with Heroku. Let's configure our app to be able to connect with MYSQL DB when it's deployed to Heroku.
Step 4 - Configure Database
NOTE:
The usual configuration done using .env file in Laravel is not going work on deployed app because that file is not pushed to Heorku when app is deployed.
Open config/datababe.php and modify it like this. Insert the below code after this line.
use Illuminate\Support\Str;
use Illuminate\Support\Str;
$url = parse_url(getenv("CLEARDB_DATABASE_URL"));
$host = $url["host"] ?? null;
$username = $url["user"] ?? null;
$password = $url["pass"] ?? null;
$database = substr($url["path"], 1);
Next update the MYSQL array in this file like this...It will take care of DB.
        'mysql' => [
            'driver' => 'mysql',
            'host' => $host,
            'port' => env('DB_PORT', '3306'),
            'database' => $database,
            'username' => $username,
            'password' => $password,
            'unix_socket' => env('DB_SOCKET', ''),
            'charset' => 'utf8mb4',
            'collation' => 'utf8mb4_unicode_ci',
            'prefix' => '',
            'strict' => true,
            'engine' => null,
        ]
Now create a Model to perform a migration with MYSQL.
php artisan make:model Product -m
Update the migration file created in database/migrations folder.
        Schema::create('products', function (Blueprint $table) {
            $table->bigIncrements('id');
            $table->string('product_name');
            $table->string('product_description');
            $table->timestamps();
        });
Let's create a seeder and prepare some dummy objects.
php artisan make:seed ProductsTableSeeder
Find the relevant seeder with database/seeds folder. Modify the seeder file like this.
<?php

use Illuminate\Database\Seeder;
use App\Product;

class ProductsTableSeeder extends Seeder
{
    public function run()
    {
        Product::create([
            'product_name' => 'MacBook Pro',
            'product_description' => 'Apple Laptop'
        ]);

        Product::create([
            'product_name' => 'Huawei GR5 2017',
            'product_description' => 'Andriod Smart Phone'
        ]);
    }
}
Now tell the main DatabaseTableSeeder to include this seeder when deploying...
    public function run()
    {
        $this->call(ProductsTableSeeder::class);
    }
Step 5 - Push the Project to Heroku
Go into the project folder and follow me by typing the below commands. Give a proper unique name with some regex.
git init
heroku apps:create herokudep99
git init
git add .
echo "web: vendor/bin/heroku-php-apache2 public/" > Procfile
git commit -m "add files to heroku"
Now go to https://dashboard.heroku.com/apps and select the app you have already created.
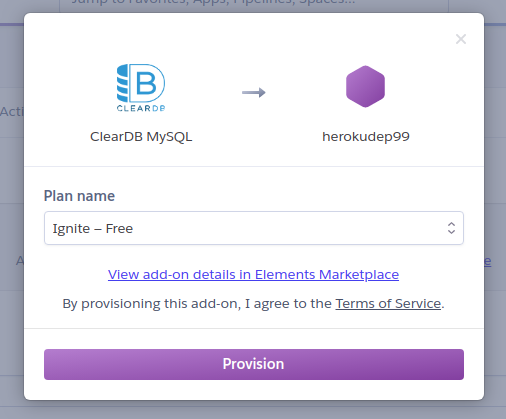
Select Resources tab and search for clearDB MYSQL. It is the addon available in Heorku for MYSQL configuration. Select this addon and click on Provision button.
Use the below command on terminal to check whether clearDB is configured or not for your app. This command will show you the URL.
heroku config | grep CLEARDB_DATABASE_URL
Now it's time to set some environment variables. Follow me gyus!!!
1. Generate a APP_KEY
php artisan key:generate --show
2. Set APP_KEY
heroku config:set APP_KEY=above_key
3. Set URL for app
heroku config:set APP_URL=herokudep99.herokuapp.com
Finally you can check your configs with this command..Check carefully all the variables are there...
heroku config
Now we are ready to deploy guys!
git push heroku master
The below command will migrate the migrations and feed data into DB.
heroku run php artisan migrate --seed
Step 6 - Check Database
Select your app in Heroku platform and go into resources tab. Click on ClearDB MYSQL addon. Then it will direct you to a new page. There you find a link which is having your DB name(random name). Click on that link. It will direct you to another page. Move into the System Information tab and copy the username and password.Open MYSQL Workbench software and create a new instance!
NOTE:
Provide HOST name correctly. Use GREP command to see DB URL and from it, extract the host. It should be like the below one starting from us-.
us-cdbr-iron-east-05.cleardb.net
GREP Command:
heroku config | grep CLEARDB_DATABASE_URL
This is my results on workbench..
You got the results guys? If so, you have followed me correctly and nothing to be worried. Now your app deployed on Heoku has been connected to MYSQL DB as I promised at the beginning of the article! Now you can work with Laravel to create more models, migrations and seeders. Push them and see again..It will definitely work!!!
Step 7 - More Check On Data
I'm going to modify the project a little bit and check in the changes again. My aim is to configure a view with a controller to display the products array. Open teminal inside the project and type the command to create a controller..php artisan make:controller PageController
Let's add a function to the controller to dump the products as an array when we go for that view. This function will show the items collection.
<?php

namespace App\Http\Controllers;

use Illuminate\Http\Request;
use App\Product;

class PageController extends Controller
{
    public function index(){
        $products = Product::all();
        dd($products);
        return view('welcome')->with(['products' => $products]);
    }
}
Route::get('/', 'PageController@index');
That's all..Now we can push these changes to Heroku app. Open your terminal and perform these commands.
git add .
git commit -m "add controller"
git push heroku master
heroku run php artisan migrate:refresh
heroku run php artisan db:seed
What will be the result we get when we go and open the appication on browser? Go to http://herokudep99.herokuapp.com and check! You must get the this result since we seeded two products into the table in Heroku!
NOW IT'S OVER GUYS!!!
So, this is the end of today's article..I hope you got something interested into your Laravel LIFE! Keep in touch with TechPool to get more articles and more knowledge on web technologies!
GOOD BYE GUYS!


14 Comments
Good Post. I like your blog. Thanks for Sharing
ReplyDeletePHP Training in Noida
Thank you Raj! Keep reading.. :D
DeleteHi, I followed the same steps, but routing is not working
ReplyDeleteWhat is the error?
DeleteHi! I follow your steps, but I have this error:
ReplyDeleteAH01276: Cannot serve directory /app/: No matching DirectoryIndex (index.php,index.html,index.htm) found, and server-generated directory index forbidden by Options directive
Thank you very much :D
ReplyDeletei deployed but images not working
ReplyDeleteThanku for sharing this article. Set in the flawless slopes of South Mussoorie. MIS, Best Boarding School For Girls has a rich history and was laid out in 1984. Arranged only 33 km away from the capital city Dehradun, this unspoiled grounds is encircled by the appeal of nature, with its air improved by pine, deodar, and other coniferous trees. Laid out to make worldwide residents who can get through any conceivable trial of life through training, MIS sustains sure pioneers furnished with common information and inward harmony. The school educational program sticks to global principles and the greatest guidance guarantees that understudies are prepared to have adjusted existences.
ReplyDeleteThanks a lot for giving us such a helpful information. You can also visit our website for hand written assignment ignou
ReplyDeleteGet top-notch Law assignment help from qualified experts. We offer personalized support to enhance your understanding and improve your grades in legal coursework.
ReplyDelete11Xplay is your go-to platform for an unparalleled online gaming experience, offering sports betting and casino games designed specifically for Indian players. Enjoy live sports betting, favorite games such as Teen Patti and Rummy, along with fast, secure payments and instant withdrawals. The platform boasts a user-friendly interface and 24/7 customer support to ensure a hassle-free experience. Explore other top-notch platforms like Lotusbhai and Betbook250 to elevate your gaming journey to the next level!
ReplyDeleteWelcome to 1xbet – your trusted gateway to 1xBet’s world of gaming and entertainment. We provide a seamless, secure login experience for users to access live sports, casino games, and global events with ease.
ReplyDeleteT10 Exchange offers seamless online gaming and sports exchange experiences. With a user-friendly interface, diverse game options, secure transactions, and 24/7 customer support, it’s the go-to platform for enthusiasts. Explore innovative features and join a trusted community to enhance your gaming journey.
ReplyDeleteSatsport is your ultimate destination for cutting-edge sports insights and services in India. Offering a seamless platform for sports enthusiasts, we specialize in delivering real-time updates, secure transactions, and an unmatched user experience. Discover the best of sports engagement with Satsports today!"
ReplyDelete