Laravel CRUD - Part 1

Hi guys! I think you have already followed and read my article series on Laravel. So this is a crucial one! it's a CRUD.. That means this article will guide you to perform Create, Retrieve, Update and Delete operations using Laravel PHP framework! Since this will be a long tutorial, I divided this into two parts. This is the first part. As we have more work to do, let's move for the work..
Full Source Code on GitHub : Laravel CRUD
Full Source Code on GitHub : Laravel CRUD
What will be the goal?
To perform Create and Retrieve operations. We create an application to store details of some users/people.
Step 1 - Create a laravel project
composer create-project laravel/laravel LaravelCRUD
Step 2 - Database configuration
We need to setup our database first. Create a new database called laravel_crud. Do the usual configurations for database. If you are not aware of this visit here article.
Configuration 1- .env file

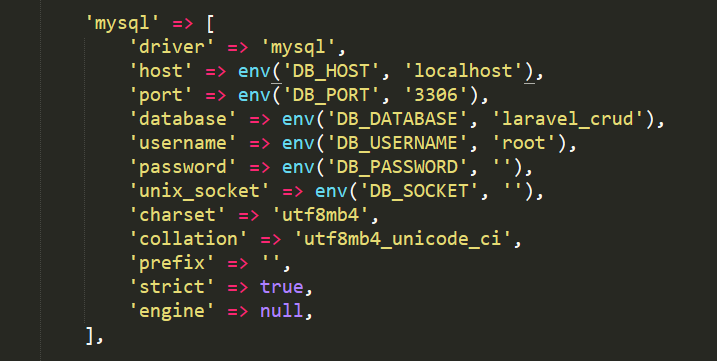
Configuration 2 - config/database.php
Configuration 3 - Database migration => database/migrations
Edit the existing create_users_table.php migration file like this. We add a new column for user image.
<?php

use Illuminate\Support\Facades\Schema;
use Illuminate\Database\Schema\Blueprint;
use Illuminate\Database\Migrations\Migration;

class CreateUsersTable extends Migration
{
    /**
     * Run the migrations.
     *
     * @return void
     */
    public function up()
    {
        Schema::create('users', function (Blueprint $table) {
            $table->increments('id');
            $table->string('name');
            $table->string('email')->unique();
            $table->string('user_image');
            $table->rememberToken();
            $table->timestamps();
        });
    }

    /**
     * Reverse the migrations.
     *
     * @return void
     */
    public function down()
    {
        Schema::dropIfExists('users');
    }
}
Then we need to do another setting to avoid the migration errors.
Open app/Http/AppServiceProvider.php file and edit the file in this way.
<?php

namespace App\Providers;

use Illuminate\Support\ServiceProvider;
use Illuminate\Support\Facades\Schema;

class AppServiceProvider extends ServiceProvider
{
    /**
     * Bootstrap any application services.
     *
     * @return void
     */
    public function boot()
    {
        Schema::defaultStringLength(191);
    }

    /**
     * Register any application services.
     *
     * @return void
     */
    public function register()
    {
        //
    }
}
Now we are ready to migrate. Open your cmd and navigate into the Project folder and then type php artisan:migrate command to create the database table called users. Output will be like this when you see the database from phpmyadmin.

<?php

namespace App;

use Illuminate\Notifications\Notifiable;
use Illuminate\Foundation\Auth\User as Authenticatable;

class User extends Authenticatable
{
    use Notifiable;

    /**
     * The attributes that are mass assignable.
     *
     * @var array
     */
    protected $table = 'users';
    // primary key
    public $primaryKey = 'id';

    protected $fillable = [
        'name', 'email', 'password', 'user_image',
    ];

    /**
     * The attributes that should be hidden for arrays.
     *
     * @var array
     */
    protected $hidden = [
        'password', 'remember_token',
    ];
}
Step 3 - Create the basic views
I will create the master file as the layout view. This will be the key for all the other views. This is the power of blade template engine! You can get more details from here. I'm using Bootstrap 4 for styling the pages.resources/views/master.blade.php
<!doctype html>
<html lang="{{ app()->getLocale() }}">
    <head>
        <meta charset="utf-8">
        <meta http-equiv="X-UA-Compatible" content="IE=edge">
        <meta name="viewport" content="width=device-width, initial-scale=1">
        <title>Laravel CRUD</title>
        <link rel="stylesheet" href="https://maxcdn.bootstrapcdn.com/bootstrap/4.0.0/css/bootstrap.min.css" integrity="sha384-Gn5384xqQ1aoWXA+058RXPxPg6fy4IWvTNh0E263XmFcJlSAwiGgFAW/dAiS6JXm" crossorigin="anonymous">
        <link href="https://fonts.googleapis.com/css?family=Roboto:100,600" rel="stylesheet" type="text/css">
    </head>
    <body>
    <div class="container" style="margin-top: 50px;">
        @yield('content')
    </div>
    <script type="text/javascript" src="https://cdnjs.cloudflare.com/ajax/libs/jquery/3.2.1/jquery.min.js"></script>
    <script src="https://maxcdn.bootstrapcdn.com/bootstrap/4.0.0/js/bootstrap.min.js" integrity="sha384-JZR6Spejh4U02d8jOt6vLEHfe/JQGiRRSQQxSfFWpi1MquVdAyjUar5+76PVCmYl" crossorigin="anonymous"></script>
    </body>

</html>
resources/views/crud.blade.php
I will create the crud file for the front view. This will be inherited from the master view.
@extends('master')
@section('content')
<div class="col-lg-12">
 <h1 class="text-center">Laravel CRUD</h1><br>
  <div class="row">
   <div class="col-lg-2"></div>
   <div class="col-lg-8">
    <div class="card">
     <div class="card-body">
      <div class="card-text">
       This is a simple application done using Laravel to perform CRUD operations including Create, Retrieve, Update and Delete.
      </div><br>
      <img src="https://i0.wp.com/happycoder.me/wp-content/uploads/2018/01/laravel-5.6-1.jpg?fit=700%2C368" style="width: 670px; height: 300px; margin: auto;display: block;"><br>
      <a href="/crud/create" class="btn btn-primary">CREATE A USER</a>
      <a href="/crud" class="btn btn-success">VIEW USERS</a>
     </div>
    </div>

   </div>
   <div class="col-lg-2"></div>
  </div>
 </div>
@endsection
Still, don't go to run the project! I will tell it at the best point..
Step 4 - Create a Controller (Resource Controller)
Since we are creating a CRUD application, we need a resource controller. It will make our work easy. So, open cmd and type this! Wait for editing this controller...php artisan make:controller CrudController --resource
Step 5 - Create Routes
Open the file web.php file in the routes folder. Then we need to re-arrange our route for the front page and the resource controller functions. Add this to web.php file.
<?php

//Front view
Route::get('/', function () {
    return view('crud');
});
//create all resource controller function routes
Route::resource('crud', 'CrudController');
After you adding the second route, routes for all the resource controller functions are created by Laravel automatically. You can pick them to link your pages. To see them, open the cmd and type
php artisan route:list

Step 6 - Run your project
This is the time to run the project. Type this in cmd.. php artisan serve

Step 7 - Create the controller functions
Here we will create 3 functions. Controller is in the app/Http/Controllers folder.
- index function - load the database results
- create function - load the form page
- store function - store the submitted data to DB
<?php

namespace App\Http\Controllers;

use Illuminate\Http\Request;
use App\User;
use Storage;

class CrudController extends Controller
{
    /**
     * Display a listing of the resource.
     *
     * @return \Illuminate\Http\Response
     */
    public function index()
    {
        $users = User::orderBy('id','desc')->paginate(5);
        return view('index',['users' => $users])->withTitle('Users in Database');
    }

    /**
     * Show the form for creating a new resource.
     *
     * @return \Illuminate\Http\Response
     */
    public function create()
    {
        return view('create')->withTitle('Create a user');
    }

    /**
     * Store a newly created resource in storage.
     *
     * @param  \Illuminate\Http\Request  $request
     * @return \Illuminate\Http\Response
     */
    public function store(Request $request)
    {
        // validate inputs
        $this->validate($request, [
            'name' => 'required',
            'email' => 'required',
            'user_image' => 'image|nullable|max:1999'
        ]);
                // file upload
        if($request->hasFile('user_image')){
            $fileNameWithExt = $request->file('user_image')->getClientOriginalName();
            // get file name
            $filename = pathinfo($fileNameWithExt, PATHINFO_FILENAME);
            // get extension
            $extension = $request->file('user_image')->getClientOriginalExtension();

            $fileNameToStore = $filename.'_'.time().'.'.$extension;
            // upload
            $path = $request->file('user_image')->storeAs('public/user_images', $fileNameToStore);
        }
        else{
            $fileNameToStore = 'noimage.jpg';
        }
        // create user
        $user = new User;
        $user->name = $request->input('name');
        $user->email = $request->input('email');
        $user->user_image = $fileNameToStore;
        $user->save();
        // redirect to the create page with success message
        return redirect('/crud/create')->with('success', 'User created');
    }
}
Step 8 - Create the data insert view
For this, we have to create a form to input the data. In Laravel usually we use a form builder tool to create forms. It's Laravel Collective package. You have to install it to your project. Go to this link. Just follow the installation steps. After installing this you can use a different version of form tags with the binding option available in Blade Templates.( using {!! !!} )
 Then you can use this! The other thing is we are going to re-arrange the file input button. In usual form, file id not showing when it is uploaded. So, I need to show the image. Here I use Dropify JS and CSS to implement this. Here you have a documentation. Dropify - GitHub
Go to this site and get the CDN for dropify CSS and JS. You have to place a script to activate dropify. After including dropfiy, master blade should be changed!
This will give an error due to this code line, @include('messages'). Because still we have not created messages.blade file. This is the file to show success and error messages for form submission. If there's an error or a success it throw a flash message.
Final Insert data view

resources/views/index.blade.php
 OK..Now you have completed the First Two operations from the CRUD functionalities. They are Create and Retrieve.. The other two operations, Update and Delete will be discussed from the next article.
Try to implement these two functionalities correctly! I have included all the things I have done! So, if you have any question, drop a comment here....
Good Luck Guys!!!

Go to this site and get the CDN for dropify CSS and JS. You have to place a script to activate dropify. After including dropfiy, master blade should be changed!
Final version - resources/views/master.blade.php
<!doctype html>
<html lang="{{ app()->getLocale() }}">
    <head>
        <meta charset="utf-8">
        <meta http-equiv="X-UA-Compatible" content="IE=edge">
        <meta name="viewport" content="width=device-width, initial-scale=1">
        <title>Laravel CRUD</title>
        <link rel="stylesheet" href="https://maxcdn.bootstrapcdn.com/bootstrap/4.0.0/css/bootstrap.min.css" integrity="sha384-Gn5384xqQ1aoWXA+058RXPxPg6fy4IWvTNh0E263XmFcJlSAwiGgFAW/dAiS6JXm" crossorigin="anonymous">
        <link href="https://fonts.googleapis.com/css?family=Roboto:100,600" rel="stylesheet" type="text/css">
        <link rel="stylesheet" href="https://cdnjs.cloudflare.com/ajax/libs/Dropify/0.2.2/css/dropify.min.css">
    </head>
    <body>

    <div class="container" style="margin-top: 50px;">
        @yield('content')
    </div>


    <script type="text/javascript" src="https://cdnjs.cloudflare.com/ajax/libs/jquery/3.2.1/jquery.min.js"></script>
    <script src="https://cdnjs.cloudflare.com/ajax/libs/Dropify/0.2.2/js/dropify.min.js"></script>
    <script>
        $(document).ready(function() {
            $('.dropify').dropify();
        });
    </script>
    <script src="https://maxcdn.bootstrapcdn.com/bootstrap/4.0.0/js/bootstrap.min.js" integrity="sha384-JZR6Spejh4U02d8jOt6vLEHfe/JQGiRRSQQxSfFWpi1MquVdAyjUar5+76PVCmYl" crossorigin="anonymous"></script>
    </body>

</html>
Insert view - resources/views/create.blade.php
@extends('master')
@section('content')
 <div class="col-lg-12">
  <div class="row">
   <div class="col-lg-3"></div>
   <div class="col-lg-6">
    <h1 class="text-center">Laravel CRUD</h1><br>
    @include('messages')
    <div class="card">
     <div class="card-body">
         {!! Form::open(['action' => 'CrudController@store', 'method' => 'POST', 'enctype' => 'multipart/form-data']) !!}
         <div class="form-group">
             {{ Form::label('name', 'Your Name ', ['class' => 'form-label'] )}}
             {{ Form::text('name', '', ['class' => 'form-control', 'placeholder' => 'Give a Name', 'id' => 'name']) }}
         </div>
         <div class="form-group">
             {{ Form::label('email', 'Your Email ', ['class' => 'form-label'] )}}
             {{ Form::text('email', '', ['class' => 'form-control', 'placeholder' => 'Give an email', 'id' => 'email']) }}
         </div>
         <div class="form-group">
             {{ Form::file('user_image', ['class' => 'dropify'])}}
         </div>
         <div class="row" style="margin-left: 0px;">
          <div class="log-lg-6">
           {{ Form::submit('SUBMIT', ['class' => 'btn btn-primary btn-md']) }}
           {!! Form::close() !!}
          </div>
          <div class="log-lg-6">
           <a href="/crud" class="btn btn-dark btn-md" style="margin-left: 10px;">Back to users</a>
          </div>
         </div>
     </div>
    </div>
   </div>
   <div class="col-lg-3"></div>
  </div>
 </div>
@endsection
This will give an error due to this code line, @include('messages'). Because still we have not created messages.blade file. This is the file to show success and error messages for form submission. If there's an error or a success it throw a flash message.
Step 9 - Create messages view
resources/views/messages.blade.php
@if(count($errors)>0)
@foreach($errors->all() as $error)
<div class="alert alert-danger alert-dismissible fade show" role="alert">
{{$error}}
<button type="button" class="close" data-dismiss="alert" aria-label="Close">
<span aria-hidden="true">×</span>
</button>
</div>
@endforeach
@endif
@if(session('success'))
<div class="alert alert-success alert-dismissible fade show" role="alert">
{{session('success')}}
<button type="button" class="close" data-dismiss="alert" aria-label="Close">
<span aria-hidden="true">×</span>
</button>
</div>
@endif
@if(session('error'))
<div class="alert alert-danger alert-dismissible fade show" role="alert">
{{session('error')}}
<button type="button" class="close" data-dismiss="alert" aria-label="Close">
<span aria-hidden="true">×</span>
</button>
</div>
@endif
Final Insert data view
You have completed the Create operation! Now you can insert data!
You can see the data from the url => localhost:8000/create
Now You have to do a special thing!
You have to build up a link between storage and public folder in the project.
When you insert data, images are uploaded to the public/user_images folder. But we are going to store it in the storage folder. Then we retrieve images from this storage. Open a cmd and go into the project and type php artisan storage:link. Now, whenever you upload images, they are sent to the storage folder also.
Step 10 - Create the view to display data
We have to display the data inserted into the database. For this I'm using a table format!resources/views/index.blade.php
@extends('master')
@section('content')
 <div class="col-lg-12">
  <h1 class="text-center">Users stored in database</h1><br>
  @include('messages')
  <a href="/" style="float: right;" class="btn btn-dark btn-md">Back to Front</a>
  <a href="/crud/create" style="float: right;;margin-right: 10px;" class="btn btn-info btn-md">Create a user</a><br><br>
  <table class="table table-bordered table-striped">
   <tr>
    <th>User ID</th>
    <th>Image</th>
    <th>Name</th>
    <th>Email</th>
    <th>Actions</th>
   </tr>
   @if(count($users) > 0)
   @foreach($users as $user)
    <tr>
     <td>{{ $user->id }}</td>
     <td><img height="100px" width="100px;" class="img-thumbnail" src="/storage/user_images/{{ $user->user_image}}"></td>
     <td>{{ $user->name }}</td>
     <td>{{ $user->email }}</td>
     <td>
      <div class="row" style="margin-left: 5px;">
      <a href="/crud/{{ $user->id }}" style="margin-right: 10px;" class="btn btn-info btn-sm">view</a>
      <a href="/crud/{{ $user->id }}/edit" style="margin-right: 10px;" class="btn btn-warning btn-sm">edit</a>
      {!! Form::open(['action' => ['CrudController@destroy', $user->id], 'method' => 'POST']) !!}
                            {{Form::hidden('_method', 'DELETE')}}
                            {{Form::submit('Delete', ['class' => 'btn btn-danger btn-sm float-right'])}}
                        {!! Form::close() !!}
      </div>
     </td>
    </tr>
   @endforeach
   @else
    <h3 class="text-center">No user in Database</h3>
   @endif
  </table>

 </div>
@endsection
This is the data Retrieve part. Now it's completed!
You can see the data from the url => localhost:8000/crud
Try to implement these two functionalities correctly! I have included all the things I have done! So, if you have any question, drop a comment here....
Good Luck Guys!!!


10 Comments
Thank you very much :D
ReplyDeleteYou have provided useful information on Laravel Crud Function. I have recently studied laravel and this information is very helpful.
ReplyDeleteLaravel Web Development Services
Thank you for your feedback Ankita :D
DeleteThanks for your helpful article.
ReplyDeleteGutter Cleaning Sydney
How i can find good laravel developers? any source
ReplyDeleteLearn Quran Online
Laravel Blade While Loop Example
ReplyDeleteGood job! For Sharing your best ideas... I will refer the people to best learning and training Institute for online courses... click the below link:
ReplyDeleteshort courses in pakistan
react native advanced concepts
sorting algorithms c++
graphic designing institute
mern stack course online
php training institute
e commerce online course in pakistan
Tech inn Solutions
Good Job! You have Shared your well knowledge... I will refer the people to the best IT Solutions providers click the below link:
ReplyDeleteit solutions website
pakistan web developer
app development in pakistan
software developers in pakistan
digital marketing in pakistan
website maintenance packages
professional it consulting services
Cre8tivebot
How To Delete Data Using Ajax With Delete Message In Laravel
ReplyDeleteWe can delete data easily without refreshing a page using ajax and jquery with modal in laravel. Here we can use controller, modal and route so that we can delete data in proper way without refreshing page..
For More Info:- How To Delete Data Using Ajax With Delete Message In Laravel
I was nervous when I Clicked on this on this blog I felt what im looking for this blogs haves but thank you to the author who has everything in this blog for what im looking for. This blog writer has the best knowledge about laravel.
ReplyDeleteIf you're looking for Laravel Web Development Services in India so, you can visit our CodeKing Solutions for the best offers.